Conservators at the Alaska State Museum are regularly asked this question:

“What’s that white stuff?”

Disfiguring white stuff on artifacts and artworks can be the result of a wide range of causes. These are referred to by a variety of terms including: efflorescence, bloom, fatty bloom, spue, blushing, chalking, blanching, haze, dust, grime, salts, mold, transferred images, crizzling, sweating and patina. While these terms each refer to specific types of damages and disfigurements, they are often used interchangeably. This may be due to the similar appearance many of them have at first glance. White fuzzy material on an artifact is often assumed to be some type of mold. Sometimes this is the case, but a number of other things can have the same appearance. Staff at the Sheldon Jackson Museum were concerned that Tlingit hide armor was breaking out with mold. Small white fuzzy patches were disfiguring the surface, and the problem seemed to be getting worse. However, upon examination, the white substance was waxy and records indicated a leather dressing treatment was undertaken in the late 1960’s. At the time, leather dressings were a common part of museum practice and believed to benefit leather by aiding flexibility. Over time, the fats can alter and come out of the leather as a bloom or spue, disfiguring the surface. Leather dressings are no longer part of museum conservation practice.

A wooden dish in the Alaska State Museum collection has a fine sugary-looking white deposit inside. Examination and history of the dish reveal the crystals are related to the bowl’s history as a vessel for holding grease or oil. The presence of those crystals is part of the history of the artifact and tells a story.

GETTING STARTED

“What’s that white stuff” is a great question. Does it belong there? Is it hazardous to humans? Is it destroying the artifact? We suggest a systematic approach to the problem.

  1. Identify the material affected. What is your artifact made of? Our INDEX lists artifact materials vulnerable to “white stuff.”
  2. Examine the context and history of the artifact. What was it used for? How was it maintained? Was it dug out of the ground? Has the environment been stable? Has it been on exhibit? Also ask folks who have worked at your museum a long time. These clues may help narrow down possibilities. Write them down.
  3. Characterize the appearance of the white stuff. Is it powdery? Sticky? Flaky? Is it a haze or a crust? Does it appear in a pattern? Use our list of descriptive words below to help you. Write it down. Take a photo for the files.
  4. Consider the typical POSSIBILITIES. For each kind of material, there are certain kinds of white stuff that we have see more than others in Alaskan collections. We try to list these in the INDEX by material.
  5. Test the hypothesis. Make a guess at what you think it is, and if you can remove a little bit, test your theory.

HOW DO I DESCRIBE WHAT I SEE?

Here’s a list of vocabulary words that can help you characterize what you are looking at.  These words, plus a photo, can help others work on solving your mystery. Check GLOSSARY if needed.

airy

branched

chalky

cloudy

crumbly

crusty

crystalline

dotted

dry

fibrous

filmy

foamy

fuzzy

glossy

grainy

greasy

hard

hazy

matte

opaque

powdery

rough

spidery

spotty

sticky

soft

sugary

translucent

HOW CAN I ANALYZE MY WHITE STUFF?

EASY

  1. Magnifying glass and strong light. Look carefully at the surface and try to characterize the appearance. Is it an optical effect from delamination or abrasion? Or is it accumulated on the surface, indicating an accretion or efflorescence?
  2. Does it roll easily on a tipped surface, like tiny dry balls?  You may have insect frass.
  3. Look for patterns on the surface or an explanation for why the white stuff is in some areas and not others. Consider different materials, which side is “up” and if the pattern may be associated with something applied as a liquid.
  4. If you can sample it with a small pointy tool, note how difficult it is to remove. Powdery? Crumbly? Sticky? Smeary?  This is an important clue. Don’t remove it all during sampling, you may want to try again with another idea.
  5. If you have removed a bit of it, try rubbing some of it on a clean glass surface. Does it smear? Or does it stay crumbly/powdery? A smearing substance can indicate the presences of fats or waxes and may indicate the sample is some type of fatty bloom.
  6. Try adding a drop or two of water, enough to cover the sample. Does it dissolve? If so, it may be a water-soluble salt.
  7. With another sample, try adding a drop or two of mineral spirits.  Does it dissolve now?  Perhaps it is something waxy.
  8. If the sample melts with gentle heating, it may be a wax or bloom. Melting can be done over a hotplate, or even with a bit of foil over a candle.

TRICKY:

  1. If you have a binocular microscope, you can see more detail. For example, branching structures of mold may be visible. Crystals may be evident. Bug parts are more obvious under magnification.
  2. If you have a polarized light microscope, you can see even more detail and observe optical properties. Fruiting bodies confirming mold may be present.

HARD:

  1. Various kind of instrumental analysis may be available at larger museums or universities.  For example, an XRF can identify certain heavier elements that point to specific possibilities like metal corrosion, pesticides etc.
  2. If you are equipped to use acids safely, add a couple of drops of HCl. If your sample bubbles vigorously, it may be a carbonate. Maritime accretions and insoluble archaeological salts often bubble with this test.
  3. While some resources may suggest tasting the salt to confirm that is what it is…this is not a good idea and tasting should never be done to identify an unknown substance. The salts forms in Byne’s disease, for example, are not components of common table salt (sodium chloride) and should not be consumed.
  4. Spot testing can help characterize “white stuff” but you must be equipped with a chemistry lab and familiar with laboratory techniques to perform many of these tests. The main museum reference for these tests is:

Odegaard, Nancy, Scott Carroll, and Werner S. Zimmt. (2005) Material Characeterization Tests for Objects of Art and Archaeology.  Second Edition. Archetype Publications Limited. London.

The mold was on many different materials of the long weapons: bone, ivory, feather, wood, leather

During Crista Pack’s 2011 summer project at the Alaska State Museum, she found several artifacts with a strange white mold-like substance on them.   Suspiciously, the items were all from the same 2003 accession, but not all the artifacts from that accession had the mold.  Baskets and other weapons were fine.  And incoming paperwork and photographs indicated there was no issue when they arrived.  None of the other artifacts in the drawer had the mold, just a few from this donation.  To deepen the mystery, I realized this was similar to a spot of strange white mold that had been previously found on a basket at the Sheldon Jackson Museum in Sitka.  We convinced ourselves through microscopy that in spite of proper storage and environmental conditions at both museums, indeed we DID seem to be seeing mold.  Yikes!  

This speck of similar-looking mold had been seen earlier on a basket in our museum collection, but in a different city! The long weapons and basket had never been in the same town.

Careful examination of both the Alaska State Museum and Sheldon Jackson Museum collections failed to turn up any further examples.  Crista was determined to get to the bottom of it and pursued the question during her next semester of school at the University of Delaware/ Winterthur graduate training program in conservation.  Here is her excellent report on the matter:

Mold Growth and Prevention in Museum Environments_Research Paper

After receiving the report, I emailed her a few more questions, and here were her responses:

Ellen: We’ve definitely got mold, maybe a couple different kinds mixed together but some of that possibly due to contamination on the way?

Crista: Yes – the fact that these were the only items in the drawer affected makes me think that these spores came in on the artifacts.  Especially if these have just been hanging out in the drawer for the past 6 years. If they’d been on display for any length of time, then that might be a different story. Either way, the molds that were identified are all very typical molds found on things in interior spaces.

Ellen: So, RH alone isn’t the culprit for mold growth, although we tend to focus on it.  Temp, nutrients, water content, mold type also matter.

Crista: Yup – RH is much easier to measure than water content, so people tend to focus on it more.  Most interesting I thought was that mold does not appear to take water from the air…it takes it through the substrate. So RH will impact the water content of an object…but that is going to vary according to different materials, other environmental factors, etc. etc.

Ellen: Let me get this right…we likely have mold because there were spores already there and the temperature and nutrient conditions were good and the mold type is a kind that has some of its own moisture/ doesn’t need as much moisture to flourish? 

Crista: I think so…although I can’t confirm that the mold is specifically the type that doesn’t need as much moisture to flourish – I just wouldn’t rule it out. If it’s not, then the other combination of temp, nutrients and water content of the substrate (and/or dust in crevices) would be more at play. 

Basically, I’ve learned that mold is freakishly smart and resourceful…and it has an incredibly strong will to survive. And that regulating RH can help prevent it because water content plays an important role – BUT it is really hard to define a specific RH limit, because each and every situation is going to be unique. I think the current guidlines that most people seem to adopt of keeping spaces below 60% is probably good and prevents a lot of mold from growing…but it’s like birth control… it’s only effective 99% of the time (or so I’m told!).  And actually, the RH guidelines might not even be effective 99% of the time…I’d guess more like 92% of the time. 😉 That is my extremely scientific calculation that I’m giving you there..haha!

Under construction August 2011

1. BACKGROUND

Many kinds of feathers are used on Alaskan artifacts, particularly those of Native manufacture. Most commonly, feathers are seen as appendages on masks or as fletching on hunting tools or weapons.

2. POSSIBLE CAUSES

The most common white stuff we have seen on Alaskan feathers is insect debris (such as cocoons and frass) or mold. This is most often seen in association with feather damage consistent with insects eating the feathers. Pesticides are also a possibility. The Alaska State Museum has hundreds of taxidermy bird mounts that have tested positive for arsenic.  Some of these mounts may close to 100 years old.  Most bird mounts added to the collection since 1970 were preserved with a freeze-drying technique, but these are at risk for insect infestation.

One mysterious case of “white stuff” involves a hunting tool that displays a sticky, branched fibrous-looking mold. The item came into the collection in 2003 in excellent condition, displaying no mold or “white stuff”. The mold appears irregularly on feather fletching, string lashing, leather lashing, bone, ivory and wood parts. Could it be growing from some sort of coating that was sprayed on the artifact?  The most perplexing part of this mystery is that the artifact has been in a controlled collections storage room inside a cabinet with temperature and relative humidity well below what would be expected to support mold growth. We hope to work with intern Crista Pack when she returns to the University of Delaware to investigate the cause of this peculiar “white stuff.”

3. REFERENCES 

4. EXAMPLES IN ALASKA

Under Construction, August 2011

1. BACKGROUND

Shells can refer to various types of hard protective coverings composed primarily of calcium carbonate and comprise the exoskeletons of invertebrates, the outer layer of an egg or other similar specimens commonly found in natural history collections.

2. POSSIBLE CAUSES

The most common cause of white stuff on shell is Byne’s Disease. Is it contagious?? No, Byne’s is not a transmissible or infectious disease and cannot be spread to you or throughout your collection. What it can do is alert you to improper storage conditions.

Byne’s is a chemical reaction that causes the physical breakdown of calcareous (containing calcium carbonate) materials. The phenomenon is named after Loftus St. George Byne, a 19th century British amateur naturalist who described the finding of this condition in shell collections. He mistakenly assumed the condition was caused by some type of bacteria. Subsequent research in the field revealed that the condition was actually due to chemical reactions taking place at the shell surface. Nonetheless, the term Byne’s “disease” stuck and is still in use.

When the calcium carbonate in shells comes into contact with acidic vapors, salts can crystalize on or erupt through the surface of the shell. Acidic vapors can off-gas from certain storage materials – particularly wood-based and certain plastic products. These kinds of materials can produce acetic acid and formic acid gases, which are then dissolved in atmospheric water and combine with calcium carbonate to form calcium acetate and calcium formate salts. Higher humidity creates more atmospheric water and will accelerate the reaction.

The reaction will destroy the surface of the shell and cannot be reversed. However, changing the environmental and storage conditions can stop the reaction from occurring and prevent further loss.

The overall appearance on the surface of a shell may look very similar to mold. It is described as initially appearing as white, rough, chalky, or fuzzy in patches; perhaps with streaks or spots. These are easiest to see on dark and smooth shell surfaces. Though it may look mold-like, microscopic examination will show a structure that looks distinctly crystalline and mineral – not biological. A vinegary smell in the storage area is another clue. Acetic acid (formed when wood breaks down) is also the main component of vinegar and it’s smell indicates the presence of this vapor and the potential for Byne’s “disease.”

At the Alaska State Museum, we tried an experiment to force Byne’s Disease with little success. We gathered mussel, clam, and scallop shell from the beach, cleaned them, and exposed them to fresh oak sawdust. We tried this enclosed at room temperature, in a lab oven, and even added moisture to accelerate the reaction, but after 8 weeks we did not have drastic crystal formation.  This suggested to us that Byne’s disease formation may take a long period of poor storage. One shell, however, did grow a nice mold sample at high humidity!

3. REFERENCES

National Park Service. (2008) “Byne’s “Disease:” How To Recognize, Handle And Store Affected Shells and Related Collections.” Conserve O Gram. August 2008, Number 11/15.

Crista Pack’s notes: Conserve O Grams provide a great model for how to write a concise, informative article that is useful to conservators and non-conservators alike. Topics covered include history, causes, problematic materials, identification, cleaning, and prevention.  “Byne’s disease” can occur in any natural history specimen composed of, or including calcium carbonate. This includes …limestone-based rocks and fossils.” Includes a great Table listing damaging materials that have been used in museum. “Health and Safety Warning: Calcium acetate and calcium formate…are not the same as common table salt (sodium chloride). NEVER taste these salts, even though you may see this recommended in older literature.”  The salt crystals are water-soluble and may be removed with a brief soak or gentle brushing under running water.  Alcohol, boiling, freezing or microwaving, are NOT recommended.  If storage environment is not altered, the process will start again.

Tennent, Norman H. and Thomas Baird. (1985) “The Deterioration of Mollusca Collections: Identification of Shell Efflorescence.” Studies in Conservation Vol.  30 pp.73-85.

Crista Pack’s notes:  Begins by providing definitions for efflorescence, the methods that have been used to analyze them (XRD, IR, TGA and NMR spectroscopy), and provides the chemical formulas for different components.  The authors also discuss the cause of efflorescence formed on shell from exposure to acetic and formic acids (from wood cabinets). Gives a really good overview of methods used for analysis and descriptions for how the efflorescence forms on different types of shells (patterns, similarities between different shells, natural protective coatings that inhibit growth in some areas, etc.).  Provides some interesting discussion on how NaCl (salt) enhances growth – salt from ocean or salt from washing/boiling shells in salt water which was occasionally done. Page 76 contains excellent images of examples. There is a large section dedicated to the technical analysis studies and the data that was acquired from them. This was a little too in-depth for the scope of this project, but would be useful for anyone with access to this kind of analytical equipment and would like a comparison. The conservation section was short, but touches on the pros and cons of cleaning off efflorescence. More could have been said about the potential damage that could occur from removing efflorescence , as well as something – even just a short statement – about ethics of removing original material. Also gives a short statement about the need for safe materials to be used in the storage of artifacts and refers readers to Blackshaw and Daniel’s article “Selecting Safe Materials for use in the display and storage of antiquities.”  Another method for preservation given is coating the shell, however the article unfortunately fails to mention what shells can be coated with.

Wikipedia. “Byne’s disease.” Online: http://en.wikipedia.org/wiki/Byne’s_disease. Accessed June 29, 2011; last modified on 14 November 2010 at 03:52.

Crista Pack’s notes: While all Wikipedia articles have to be taken with a grain of salt, this one is particularly good in its depth of coverage on the topic and easy-to-understand explanation of the deterioration. It also contains a good list of references with links to pdf articles and a number of good images.

4. EXAMPLES IN ALASKA

Under Construction, August 2011

1. BACKGROUND

Alaska Native and non-Native cultures have made extensive use of mammal fur for all manner of clothing, gear, and artwork. And one can hardly enter a museum, airport, or mall anywhere in Alaska without encountering stuffed mounts of iconic Alaskan animals. The website for the Alaska Fur ID Project includes information about the mammals most often used on artifacts in Alaskan collections.

2. POSSIBLE CAUSES

The most common white stuff we have seen on Alaskan taxidermy is arsenic.  Arsenic is one of the more common pesticides found as residue on many types of objects. According to the National Park Service, arsenic compounds were frequently applied during the 18th – 20th centuries in the form of soap mixtures and sprays to preserve biological specimens and ethnographic objects (Conserve O Gram 2/3 2000,1). To identify arsenic, the National Park Service recommends to

“Look for powdery or crystalline deposits at the base of feathers and hairs, around eyes, in or at the base of ears, around mouth or bill, along ventral incision, at base of tail, and on foot pads. On ethnographic objects, inspect crevices and seams where arsenic may have collected. Even if deposits are not evident, all natural history specimens collected and prepared before the 1980s should be tested for the presence of arsenic.” (Conserve O Gram 2/3 2000, 2)

On fur, the most common white materials are associated with insects. Frass, webbing, cocoons, bug parts, shed larval skins and the like are often found in association with hair loss and even holes chewed through the hide. Occasionally there will be small widely spaced hard blobs adhered to the shaft of the hair down toward the skin, and I have been led to believe that those accretions are more likely from bugs that were bothering the furry creature while it was alive.  You may also see adhesives associated with tear repair from the skin side, such as BEVA 371 film and Reemay (a spun bonded synthetic fabric that is thin and web-like).

3. REFERENCES

_____(2010) “Appendix: Common Museum Pesticides” Pesticide Mitigation in Museum Collections: Science in Conservation: Proceedings from the MCI Workshop Series Smithsonian Contributions to Museum Conservation. Smithsonian Institution Scholarly Press Editor: Charola, A. Elena;Koestoer, Robert J. pp. 71-72

National Park Service’s Conserve O Gram on arsenic: http://www.cr.nps.gov/museum/publications/conserveogram/02-03.pdf

4. EXAMPLES IN ALASKA

Under Construction, August 2011

1. BACKGROUND

A huge range of wooden artifacts are found in Alaskan collections. These range from waterlogged archaeological remains, to traditional Native feast dishes and tools, to picture frames, furniture and fine carvings.

2. POSSIBLE CAUSES

The most common white stuff we have seen on Alaskan wooden artifacts are fatty bloom, dust, mold, paint spatters, polyethylene glycol treatment, insect debris (such as frass) and pesticides.

Bloom

When seeing fuzzy white growth on an object, people’s initial assumption is often that it is a mold or mildew. But this is not always the case. Blooms can sometimes have a feathery or matted fibrous look similar to mold, but microscopic examination and solubility tests can confirm the presence (or absence) of bloom. White bloom resulting from fats, oils and waxes in wooden materials may be referred to in literature as ‘fatty bloom,’ ‘fat bloom,’ or ‘fatty spew (or spue). These terms all refer to the formation of crystals on the surface that form from fats or oils either applied to the surface or left as residues from use.

Bloom on wooden artifacts is caused by the application of fats and oils to the surface or from residues left behind from use. There are a number of hypotheses regarding the exact mechanism of the formation of these blooms. Some attribute it to free fatty acids that separate out and crystallize on the surface.(Ordonez and Twilley 1998, 3-4). Analysis by Scott R. Williams (1988, 65-84) found bloom on objects to be primarily composed of a variety of fatty acids including palmitic, stearic, myristic and dicarboxylic acids (such as azelaic). These were present individually or occasionally as mixtures; however palmitic and stearic were the most commonly found (Williams 1988, 68-69). In general, however, it is believed that temperature and humidity levels play important factors in the migration and crystallization process.

Bloom can have a variety of appearances depending on the storage conditions, fats present in or on the object, and the type of material the bloom is forming on. It can appear powdery, granular, or branch-like. This makes it easily confused with other types of white stuff that can be found on objects. Throughout our survey, the most common type of bloom found on wood artifacts had a very crystalline, almost sugary appearance to it. In some cases it had been partially rubbed off the surface. A wide variety of wooden trays, bowls, dippers, ladles and spoons traditionally made by Alaska Native cultures were used in connection with animal oils such as seal oil or eulachon oil. These dishes often, but not always, have a darkened surface from the oil as well.

An important note is that fat bloom is often primarily found on areas of an object exposed to air. For example, on a leather-bound book the spine of the book (if it faces outward) may have the heaviest bloom. In some instances, it has been found that items closer to an air conditioning vent had a higher occurrence of bloom (Gottlieb 1982, 37) indicating that air circulation, temperature, and humidity play an important role.

Mold

Mold is typically described as having a fuzzy, velvety, or sometimes slimy appearance. When viewed under a microscope, the vegetative part of mold (known as mycelium http://en.wikipedia.org/wiki/Mycelium) can be seen as thin, thread-like branching hyphae and is very distinctive from the crystalline structure of salts.  Mold growth generally begins to occur on organic materials when the environment is at 70% relative humidity or higher. The Canadian Conservation Institute (CCI) gives the following useful chart for mold growth on their “10 Agents of Deterioration” website http://www.cci-icc.gc.ca/crc/articles/mcpm/chap10-eng.aspx:

Pesticide Residue

Up until the late 20th century, the application of toxic pesticides to organic materials in museum collections was a widespread and accepted practice. Compounds made of arsenic or mercury were sometimes sprayed or dusted onto artifacts to prevent pest damage. DDT was also common as were moth balls comprised of dichlorobenzene or naphthalene. The carcinogenic and hazardous nature of these chemicals is now known and they are no longer used. However, the residues of past applications remain and they can sometimes show up as white residues that may be confused with other salt formations. On wood, pesticide residues may appear as a whitish, spotty haze over the surface of the object. When handling objects made of organic materials such as skin, it is always better to err on the side of caution and protect yourself from possible exposure to toxic chemicals. Wear protective gloves and a lab coat or apron. You may wish to wear a dust mask to prevent breathing in toxic dust.

Pests/Frass

Frass is the excrement passed by insects. It can be fine and powdery to grainy and pellet shaped in appearance. Frass often takes on the color of whatever substance has been eaten. In the case of light colored woods, if the frass is seen against a dark background, it can appear very light in color and might almost seem white or off-white. Yellow or beige may be more typical.  One type of wood boring beetle is the Anobiid, also known as a powderpost beetle. These insects can be found tunneling their way through wood objects and leave behind frass that looks like tiny, lemon-shaped pellets. They are light tan in color, but may look whitish against a dark background. These insects were responsible for an extensive infestation of the Sheldon Jackson Museum collection many decades ago. More information on the Anobiids can be found on the museumpests.net website: http://www.museumpests.net/pdfholder/34image.pdf

3. REFERENCES

Mold hyphae, image by Bob Blaylock

Erickson, Harvey. (1977) Preservation of Wood Artifacts. Seattle, WA: University of Washington College of Forest Resources, October 1977.

Crista Pack’s notes: A very dated publication that reflects the acceptance and use of pesticides such as arsenate and boric acid compounds and DDT. Useful for its historical context to understand what may have been applied (and how) to wooden artifacts at that time. Erickson also discusses some different types of species (and their frass) that had been identified as potentially damaging to wood collections.  The possible discoloration and efflorescence that may develop from application of the various pesticides is discussed; although the latter is not seen as a particular problem, but rather something that can simply “be largely removed by brushing and moist cloths.”

Geier, Katharina (2006) “A Technical Study of Arctic Pigments and Paint on Two 19th Century Yup’ik Masks.”  Journal of the American Institute for Conservation. Vol 45 No 1 Spring 2006.  Pp. 17-30

Ellen Carrlee’s notes: White pigments used on masks were identified as a mixture of clays, micas, and associated minerals, consistent with reportings in the ethnographic literature.

Ordonez, Eugenia and John Twilley, John.  (1998) “Clarifying the Haze: Efflorescence on Works of Art” WAAC Newsletter 20 (1) 1998 pp 12-17.

Pearlstein, Ellen. “Fatty Bloom on Wood Sculpture from Mali.” Studies in Conservation 31 (1986) 83-91.

Crista Pack’s notes: describes the blooms found on African wooden objects. Results show that the bloom was the result of ethnographic application of oils. Examination techniques used include melting point, solubility behavior and infrared spectroscopy. States that sampling technique involved removing surface material with a fresh scalpel blade into a well slide.  Provides a really good description of the bloom mechanism and polymorphism. Within conclusion, notes that “The surest way to eliminate the bloom entirely would be to remove all of the material causing it, which is neither simple on a porous wood sculpture, nor necessarily desirable if the material is a fat of ethnographic origin.” Also notes that the application of conservation waxes can interfere with identification and cause confusion because their chemical composition can be similar to fats. Gives really great technical data on the results of the fats analyzed, but these appear to be mainly of African origin. Oils in Alaskan wooden dishes are often of marine origin, including fish and marine mammals.

Williams, R. Scott. (1989) “Blooms, Blushes, Transferred Images and Mouldy Surfaces: What Are These Distracting Accretions on Art Works?”  In Proceedings of the 14th Annual IIC-CG Conference 1988.  Edited by Johanna G. Wellheiser. Ottawa. Pp. 65-84

4. EXAMPLES IN ALASKA

Under Construction, August 2011

1. BACKGROUND

Many Alaska Native cultures have used bone, tooth, ivory and antler extensively in their tools, fishing and hunting gear, ornaments, and other items. Some of these materials may look similar if they come from an archaeological setting.  Marine mammals provided materials common to Alaska but not widely seen in many other places, such as whale vertebrae and walrus tusk ivory. Mammoth and mastodon ivory is also sometimes seen made into artifacts. Beware, material called “whalebone” is sometimes actually referring to baleen, the filtering mouth parts of certain whales.  This material looks a bit like black or brown plastic and was widely used as corset stays, for example. It is made of the protein keratin and is not actually bone at all.

2. POSSIBLE CAUSES

The most common white stuff we have seen on Alaskan bone, tooth, ivory and antler is related to exhibition or repair, such as adhesives and putties. Burned bone, tooth, ivory or antler may be “calcined” or oxidized by heating which can cause a white powdery or crusty material. Sometimes, in the case of archaeological material for example, darker surfaces chip off or abrade away and reveal lighter white-looking areas below.  This is most commonly seen on antler from archaeological contexts. The walrus tusk container seen in the image below has “white stuff” in the incised lines of the carving. The records suggest the artifact came from an archaeological context on St Lawrence Island and was sold to the Museum by a resident many years ago. The white material may have been rubbed into the incised lines at that time to help highlight the design.

3. REFERENCES

Johnson, Jessica S. “Consolidation of Archaeological Bone: A Conservation Perspective.”  Jourbal of Field Archaeology.  Vol. 21, 1994.

Ellen Carrlee’s notes: Explores consolidants used by conservators in the mid 1990’s (many of which are still used) to consolidate bone, including acrylic resins Acryloid B-72, water based acrylic colloidal dispersion Acrysol WS-24, water based acrylic emulsion such as Rhoplex AC-33, poly(vinyl) acetate resin such as AYAA or AYAF, poly(vinyl) butyral resin Butvar B-98.  Also describes consolidants that have been used in the past but are not now recommended, such as “white glue” polyvinyl acetate emulsion (Elmer’s Glue, Carpenter’s Glue), wax, shellac, cellulose nitrate (marketed as Duco or Ambroid), gum dammar, gum Arabic, polyethylene glycol (PEG or Carbowax), agar jelly, ethylhydrohyethycellulose, poly(vinyl) acetate emulsion (Vinamul or Gelva), poly(vinyl) acetate resin (Vinylite or Gelva), epoxy, cyanoacrylate “crazy glue” (marketed today as Paleobond, for example, and known to be used in Alaska). 

Koob, Stephen P. (1984) “The Consolidation of Archaeological Bone.”  Adhesives and Consolidants. Preprints of the Contributions to the IIC Paris Congress, 2-8 september 1984 London. pp. 98-102.

4. EXAMPLES IN ALASKA

Under Construction August 2011

1. BACKGROUND

Most ceramics we see in Alaska have a porous structure that can allow water soluble salts from the ground or from seawater to penetrate. When the water dries, these salts can crystallize on the surface. If the item is glazed, the salts can cause the glaze to pop off the surface in small spalls because the glaze is made of glass and is not porous. Alaska Native cultures have few traditional ceramic technologies, with the major exception of a coarse, heavily tempered ceramic. Historical ceramics from the Russian period, through the gold rush and homesteading periods up to modern times are seen in Alaskan collections.

2. POSSIBLE CAUSES

The most common white stuff we have seen on Alaskan ceramics tends to be salts from burial or contact with seawater. Adhesive residues are also common and are usually associated with the break edges. Adhesive residues from labels have also been seen. At the Alaska State Museum, we attempted to force salt crystal growth on ceramics. We gathered high-fired ceramic china from the beach site of the old Treadwell Mine dining hall on Douglas Island, but could not get any crystals to appear on that ceramic. At the same site, which is subjected to tidal action, we also buried a smashed contemporary terra cotta flowerpot for several days.  That pottery readily yielded nice crystal salt growth after only a short time in the lab oven. 

3. REFERENCES

Harry, K.G. and L. Frink. (2009) “The Arctic Cooking Pot: Why Was it Adopted?” American Anthropologist 111(3):330-343.

Harry, K.G., L. Frink, B. O’Toole, and A. Charest. (2009) “How to Make an Unfired Clay Cooking Pot: Understanding the Technological Choices Made by Arctic Potters. Journal of Archaeological Method and Theory 16 pp.33-50.

Frink, L. and K. Harry. (2008) “The Beauty of “Ugly” Eskimo Cook Pots.” American Antiquity 73(1):103-120.

Paterakis, A.B. (1987) “The Deterioration of Ceramics by Soluble Salts and Methods for Monitoring their Removal.” In Recent Advances in the Conservation and Analysis of Artifacts.  Institute of Archaeology, Jubilee Conservation conference pp67-72.

Pearson, C. (1987) “Deterioration of Ceramic, Glass and Stone” Conservation of Marine Archaeological Objects.  Butterworths.  London.

4. EXAMPLES IN ALASKA

Under Construction, August 2011

1. BACKGROUND

The Alaska State Museum has many garments and artifacts made of textile from various periods and cultures over the past few centuries. The Tlingit of Southeast Alaska have woven with mountain goat wool and cedar bark for hundreds of years, if not longer. Some items from the Russian period survive.  Military uniforms, various kinds of outdoor gear, quilts, and dolls are common as well.

2. POSSIBLE CAUSES

The most common white stuff we have seen on Alaskan textile or fiber artifacts is insect debris such as cocoons and frass.  Casemaking clothes moths and webbing clothes moths are the biggest threat. Mold and lint are two other common possibilities.

3. REFERENCES

4. EXAMPLES IN ALASKA

Under Construction August 2011

1. BACKGROUND

Glass structure is composed primarily of silicates and can remain stable and relatively unchanged for hundreds, if not thousands, of years if cared for properly.  Unfortunately, even with the proper care, this is not always the case as some glass is known to deteriorate rapidly over time.

 On a chemical level, most glass is stable.  However, some glass artifacts are known to undergo a complex disintegration.  This chemical breakdown of glass is commonly known as glass disease.  When discussed in reference to the most ubiquitous of archaeological and ethnographic artifacts, the glass bead, it is often termed ‘bead disease’.

The main component in glass is silicon dioxide, also known as silica.  Silica occurs naturally in three forms.  Its solid form is known as quartz, its amorphous or non-crystalline form is known as opal, and it is commonly found in its impure form as sand.  Glass can be made from pure silica, but it has a very high melting point of 4,172 ° F – which makes it rather difficult to work with directly.  For this reason, most glass mixtures have traditionally contained 70-74% silica and 16-22% of an alkali material, which serves to lower the glass melting point. Quite often, the alkali material used was either soda ash, a sodium carbonate which is obtained from burnt plant material, or potash, a potassium carbonate usually derived from wood ash. 

The sodium carbonate in soda ash produces a clearer glass than potash, so it was – and still is – more commonly used in glass manufacture.  However, when sodium carbonate is added to silica, the resulting glass is water soluble – meaning it will dissolve in water.  This is generally an undesirable characteristic for glass.  For that reason, lime (calcium oxide) is often added along with other minerals for better durability.  The addition of lime also helps the different components to mix together more easily.

2. POSSIBLE CAUSES

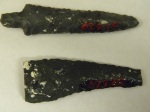
The most common white stuff we have seen on Alaskan glass artifacts is glass disease (crizzling, weeping) on beads. Abrasion, ghosting, mold, and previous treatments have also been seen on glass.

Glass Disease

While glass disease is seen on various kinds of glass objects, the most common Alaskan artifacts we have seen it on are glass beads. This damage might be historically interesting, as it might suggest a very old bead.

By the 16th century in western Europe, the production of glass (and beads in particular) became central to the economic and political endeavors of the time.  According to Lois Sherr Dubin, (2009, 29) “For Europeans, whose aim was to maintain maximum profits with a minimum commitment of manpower and resources, glass beads, exchanged for American furs or African ivory, gold, and slaves, yielded enormous margins – 1,000 percent was the return on investment, according to a report in 1632 – and thus became a central part of international trade patterns.”  

For a long time Venice was the center of glass bead production in Europe.  In 1292 A.D., glass production was moved from Venice to the nearby island of Murano in an effort to keep their production methods completely secret as well as to protect Venice from the risk of fires from the now constantly burning glass furnaces.  Production continued to increase throughout the centuries and bead making techniques were adjusted to meet the increasing demand and to decrease production costs as much as possible.  Chemical compounds that were added to glass mixtures to lower the glass melting point began to be added in even larger amounts.   This reduced the amount of fuel needed to run the furnaces and sped up the process overall.

As mentioned above, most glass consists of approximately three-quarters silica with sodium carbonate added to lower the melting point and calcium oxide to stabilize the mixture. If this combination is kept in balance, the glass is likely to remain stable. However, when there is an imbalance in the proportion of these components, problems can arise.  If there is an excess of alkali and too little lime (as was happening in Murano), the surface of the glass may begin to react with moisture in the air and start to break down.  This is the major cause of glass disease.

Glass disease is therefore inherent in the chemical makeup of certain glasses.  This is both good and bad news.  The good news is that it can’t spread to other glass in your collection– it’s not contagious. The bad news is that if the chemical composition of the bead lends itself to glass disease, there is nothing that can be done to stop it from breaking down.  The corrosive nature of glass disease causes a snowball effect of sorts on objects that succumb to it.  Once the process begins, there is no known treatment that can reverse the effects or stop it from proceeding.  The degradation can be slowed down considerably with cleaning and careful monitoring of the storage environment, but nothing will “cure” it, so to speak.

At the present time, it is not fully understood how this decomposition of glass proceeds on a molecular level.  However, we do know that in all glass the sodium and potassium carbonates are hygroscopic.  This means that they readily take up and retain moisture from the air.  Once these salts become hydrated, they can leach out of the glass and form crusty deposits on the surface.

As the sodium and potassium ions are removed from the chemical structure they are replaced by hydrogen ions, which diffuse throughout the glass.  This creates a hydrated silica network which is inherently weaker.  As the deterioration of the glass progresses, the surface of the glass becomes increasingly alkaline.  An alkaline substance is one the measures above 7 on the pH scale.

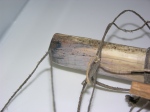
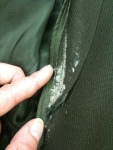
A bead with glass disease will show many symptoms, some of which can be seen easily and others that may require the use of a magnifying lens or microscope.  There are five signs of glass disease which are commonly cited by conservators.  These are: broken beads, sweating or weeping beads, white crusty deposits, crizzling, and damage to the backing material.  Additionally, as glass begins to deteriorate, it will quite often have a dull, foggy appearance.  This results from deposits left on the surface of the glass, as well as crizzling altering the reflectivity of the glass.

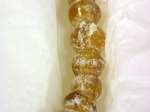
In certain environments, droplets of moisture may appear on the surface of a glass bead.  This is known as sweating or weeping.  This occurs when atmospheric moisture combines with the alkali material used in the manufacture of the glass and causes the hygroscopic alkali salts leech out.  These salts migrate to the surface forming a soapy, sticky alkaline solution.  This soapy residue forms abrasive and caustic by-products, which draws dust and dirt to the surface.  This in turn attracts more moisture to the glass and facilitates the progression of the glass bead deterioration.  Glass beads may have a white, fuzzy look to them as salts from these residues crystallize, as well as from the dust and dirt attracted to the soapy alkaline residue. 

Unstable glass and high humidity can also result in the formation of crusty deposits on the surface of beads.  As discussed earlier, alkaline products that migrate out of the beads turn into alkaline salts, which are left on the surface of the bead or adjacent material.  This produces a hard alkaline coating which can give glass a white, dusty appearance.

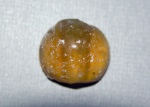
As the deterioration of unstable glass progress, small fissures in the surface of the glass start to become visible.  This is known as crizzling and it is characterized by a fine all-over cracking or fracturing of glass.  This step in the degradation of the glass can also lead to flaking and pitting on the surface of the bead.  Crizzling of the glass surface can cause transparent beads to look opaque and also contributes to the appearance of a whitish haze.

It is not known for sure whether or not glass disease occurs in some colors and/or sizes of beads more than others, but our experience through this survey of Alaskan beads is that it might.

Abrasion/scratches

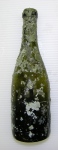
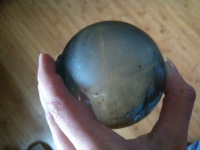
The most common problem associated with caring for historic glass, including glass beads, is their fragility.  Like all glass objects, glass beads can crack, break, or become easily scratched if they, or the objects to which they are attached, are not carefully handled. Abrasion and scratches interfere with the way light passes through the glass and can cause a whitish, opaque haze. Think of glass fishing floats, for example, which can appear hazy if they have been abraded by sand.

Ghosting or transferred images

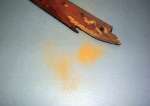
The reason that transferred images are sometimes referred to as “ghosting” is because a replica of the image can usually be seen in the glass. These images and other blooms on paintings are sometimes attributed to mold due to the microenvironment that exists between a painting and it’s glazing (Williams 1988, 66). It seems rather unlikely, however, to have a mold that grew in such a specific pattern as to duplicate an image. When the white accretions making up transferred images were analyzed in the 1980s, they were discovered to be made primarily from ketones and sodium soaps (Williams 1988, 69). The overall hypothesis for this is that ketones volatilize from the paint, condense on the glass and then oxidize into carboxylic acids. These acids then react with sodium in the glass to form the sodium soaps that make up the images (Williams 1988, 70). This is a similar reaction to that found happening in glass beads – particularly those in contact with lipid-containing ethnographic materials. It’s worth noting that in many cases where an artwork came into contact with glass, no transfer image was formed. Rather, a halo of clear glass remained around the point of contact with the transfer image forming again beyond this halo (Williams 1988, 68).  Williams describes the primary melting point of the transfer image material analyzed as being consistently at 69°-70° C (1988, 67). Since the transfer images are composed of organic compounds, they have poor solubility in water. To test this, take a small sample of the white stuff and place it on a glass slide or similar. Add a couple drops of water. If the compound does not appear to dissolve, this would rule out a soluble salt and may indicate the presence of insoluble organic compound.

mold

Mold is typically described as having a fuzzy, velvety, or sometimes slimy appearance. Mold needs organic material to feed on, so glass doesn’t commonly provide the necessary ingredients. Glass used to frame a photo at the Alaska State Museum once had branch-like mold on the inside of the glass, suggesting the gelatin of the photo might have provided enough nutrients for mold. Glass beads strung on sinew or cotton thread might also provide adequate nutrition and you might see mold growing out of and around the beads – especially if the threads/sinew have absorbed moisture and created high RH microenvironments inside of the beads. Additionally, dust and grime that accumulate on glass can provide the necessary materials to allow for mold growth. Mold was once seen on the glass touching the surface of a framed photograph at the Alaska State Museum. When viewed under a microscope, the vegetative part of mold (known as mycelium http://en.wikipedia.org/wiki/Mycelium) can be seen as thin, thread-like branching hyphae and is very distinctive from the crystalline structure of salts. Mold growth generally begins to occur on organic materials when the environment is at 70% relative humidity or higher. The Canadian Conservation Institute (CCI) gives the following useful chart for mold growth on their “10 Agents of Deterioration” website http://www.cci-icc.gc.ca/crc/articles/mcpm/chap10-eng.aspx:

Previous treatment

Different types of treatments may have been used in the past on glass beaded objects that could cause a white or hazy appearance. Adhesives may have been used to reattach beads, and these often can look cloudy and opaque as they age. Pesticide residues can create a whitish haze over the surface of materials, including beads. Pesticides were commonly applied during the early 20th century to collections containing natural history specimens and ethnographic artifacts made of organic materials such as leather, fur, and feathers.

3. REFERENCES

Mold hyphae, image by Bob Blaylock

http://en.wikipedia.org/wiki/File:20100815_1818_Mold.jpg

Carroll, Scott and Kelly McHugh.  (1999) “Material Characterization of Glass Disease on Beaded Ethnographic Artifacts from the Collection of the National Museum of the American Indian.”  Ethnographic beadwork: Aspects of Manufacture, Use and Conservation. Edited by Margot M. Wright. Conservation Centre, National Museums and Galleries on Merseyside on 22 July 1999

Ellen Carrlee’s notes: Most impacted beads fell into one of two categories: waxy/crusty beads that tested positive for triglyceride oils and powdery/crystalline beads that did not.  Sometimes kaolin clays used to whiten leather show up as white powder on beads but are not harmful.  Spot testing was also able to ID chlorides on beads throught to have contact with salt water.

Dubin, Lois Sherr (2009) The History of Beads from 100,000 to the Present.  Harry N Abrams, Inc.  New York.

Fenn, Julia.  (1987) “Deterioration of Glass Trade Beads in Contact with Skin and Leather or Glass Beads in Soapy Bubble.”  ICOM Committee for Conservation 8th Triennial Meeting, Working Group 3 Ethnographic Materials. Sydney Australia. Pp 195-197.

Jenkins, Michael R. “Glass Trade Beads in Alaska.” Alaska Journal  2.3 (1972), 31-119.

Crista Pack’s notes: Date for beads entering Alaska is unknown; however trade may have brought them into the region long before the first contact with non-indigenous explorers. Gives an insightful and thorough history of bead trading and the value of beads along the NW coast. Provides many images of different types of bead and objects beads were used in the manufacture of.

Lougheed, S. (1988) “Deteriorating Glass Beads on Ethnographic Objects: Symptoms and Conservation.”  Symposium 86: The Care and Preservation of Ethnographic Materials Editors R. Barclay et al Ottawa, Canadian Conservation Institute. Pp. 109-113.

Ellen Carrlee’s notes:  Controlling RH is the best solution for beads that exhibit early symptoms of glass dieases such as broken beads, sweating beads, crusts on bead or thread, crizzling, bleached spot below the bead on a textile, darkening of leather in contact with the bead. RH should be between 35% and 42% ought to control it.  Below 30% crizzling may occur, and above 42% alkaline carbonates that leach to the surface become hygroscopic and accelerate the process.

Ordonez, Eugenia and John Twilley, John.  (1998) “Clarifying the Haze: Efflorescence on Works of Art” WAAC Newsletter 20 (1) 1998 pp 12-17.

Pearson, C. (1987) “Deterioration of Ceramic, Glass and Stone” Conservation of Marine Archaeological Objects.  Butterworths.  London.

Sirois, P. Jane. (1999).  “The Deterioration of Glass Trade Beads from Canadian Ethnographic and Textile Collections.”  The Conservation of Glass and Ceramics: Research, Practice and Training.  Norman H. Tennant editor.  James & James.  London. Pp. 84-95

Williams, R. Scott. (1989) “Blooms, Blushes, Transferred Images and Mouldy Surfaces: What Are These Distracting Accretions on Art Works?”  In Proceedings of the 14th Annual IIC-CG Conference 1988.  Edited by Johanna G. Wellheiser. Ottawa. Pp 65-84

4. EXAMPLES IN ALASKA

Under Construction August 2011

1. BACKGROUND

Stone artifacts are most commonly seen in Alaskan collections as tools, projectile points, oil lamps, fishing gear, and argillite carvings.

2. POSSIBLE CAUSES

The most common white stuff we have seen on Alaskan stone artifacts is salts from burial or contact with seawater, fatty materials from contact with oils, or adhesive residues from old repairs or attempts to stick down an artifact during exhibition. Stone oil lamps were common in Alaska and oil from marine mammals was typically the fuel.  This may result in fatty bloom from those oils.  Many of these lamps also come from an archaeological context, or even beach context, suggesting possible salt efflorescence.

3. REFERENCES

Pearson, C. (1987) “Deterioration of Ceramic, Glass and Stone” Conservation of Marine Archaeological Objects.  Butterworths.  London.

4. EXAMPLES IN ALASKA